
Sprung zum Abschnitt
Sie können die gesuchte Antwort nicht finden? Keine Sorge, wir sind hier, um zu helfen!
Kontakt zum SupportFirst steps in hsbDesign | part 1
Add image
- The application menu contains the functions for file management, such as opening and saving, as well as the AutoCAD options.
- The ribbon contains all of AutoCAD Architecture's drawing commands in its numerous tabs.
- The hsb menu bar contains all hsbDesign commands in classic list form.
- The program name "AutoCAD Architecture 20xx" and the name of the currently open drawing file are displayed in the middle of the program bar. To the left of this are the "quick access tools" and to the right are the AutoCAD "help functions".
- The designs and plans are created in the drawing area.
- The crosshairs of the mouse pointer are used to show positions and select objects.
- The "ViewCube" supports the user in orienting themselves in three-dimensional space.
- The small selection menus contain predefined views and different visual styles.
- The axis cross at the bottom left shows the X, Y and Z directions of the current coordinate system.
- The hsbConsole is used to structure drawing content and to select the objects to be displayed.
- The tabs are used to switch between the model area and the plan layouts of the current drawing created in the paper area.
- The command line allows you to enter program commands and display the notes. It can be expanded using the F2 key.
- The program status bar shows the coordinates of the current position of the mouse pointer on the far left and the settings for the drawing aids next to it. On the right are tools for managing the model area and the layouts. The entire work area can be customized using the gear symbol. Next to it is the Z filter button.
The drawing status bar contains the selection of display configurations, the current label scale and, in the paper space, the scale of the active viewport. - The freely configurable tool palettes contain predefined commands and tools for creating and editing drawing objects.
- The properties palette shows all properties of the currently selected object.
The mouse in hsbcad
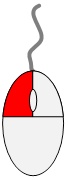
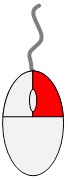
The left mouse button
Select an object:
Selecting individual objects
Select and drag from right to left (-> blue selection window):
All objects that are completely within the selection window are selected
Select and drag from left to right (-> green selection window):
“Cross” = All objects that the selection window touches are selected
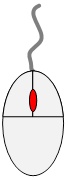
The right mouse button
Short click ≙ ENTER key:
Confirm input / selection; repeat the last executed command
Long click:
Open context menu with further commands
Shift + right mouse button click:
Set object snap method for the next click (e.g. end point, center point, ...)
The mouse wheel
Press and drag the mouse wheel:
Move the image sectionRotate mouse wheel (scroll):
Zoom Double click on mouse wheel:
Zoom on all objects in the drawingPress and drag Shift + mouse wheel:
Change the angle of the 3D view
Keyboard shortcuts
In AutoCad Architecture and therefore also in hsbDesign, most commands can be called up using the keyboard.
They are entered into the command line with their full name or keyboard shortcuts and confirmed with ENTER or the SPACEBAR.
Meaning of ENTER and SPACEBAR:
- Confirmation of a keyboard input / object selection
- Repeating the last command executed (if a keyboard input was made beforehand)
All commands and functions can be canceled using the ESC key.
(For multi-level commands, the ESC key may have to be pressed several times.)
The following list shows the most common keyboard shortcuts in hsbcad:
Basic Object Creation Shortcuts
- L -------- Line
- C ------- Circle
- A ------- arc
- REC ---- rectangle
- PL ----- Polyline (a connected line consisting of several segments)
- EL------- Ellipse
- SPL ----- Spline
- PU ------ Purge
- H ------- Hatching
- DT ------ Text (Single Line)
- MT or T - Text (Multiline)
- XL ------- Xline (Construction line)
Basic Edit Commands Shortcuts
- S --------- stretch
- M --------- Move
- CO or CP - copy
- SC -------- Scale
- DE -------- delete
- TR -------- trim (cut off with a specific element as a boundary)
- S ---------- stretch
- O --------- offset
- RO -------- rotate
- E ---------- Erase
- MI -------- mirror
- AR -------- array C
- CHA ------ chamfer
- BR -------- Break
- ME -------- Divide a line into specified distances and a remaining piece (creates points)
Independent aids Shortcuts
(Also called "Drawing Aids" or "Drafting Aids")
- RE -------- Regenerate
- Z --------- Zoom
- P --------- Pan
- U --------- Undo
- Ctrl + Y --- Redo
- DIST ------ Measure Distance
- Ctrl + S ------------- quick save
- Ctrl + Shift + S ------ Save as
Other Shortcuts
- Ctrl +z ----- undo the last actions
- Ctrl +1 ----- show Properties Palette
- Ctrl +2 ----- show Design Center
- Ctrl +3 ----- show tool palettes
- Ctrl +4 ----- show catalog library
- Ctrl +5 ----- open Project Navigator
Function keys (F...) Shortcuts
- F1 ---------- Help Displays Help for the active tooltip, command, palette or dialog box
- F2 ---------- Expanded history Displays an expanded command history in the Command window
- F3 ---------- Object snap Snaps to precise points (endpoints, midpoints, centers, etc.)
- F4 ---------- 3D object snap Turns additional object snaps for 3D on and off
- F5 ---------- Isoplane Cycles through 2D isoplane settings
- F6 ---------- Dynamic UCS (AutoCAD only)Turns automatic UCS alignment with planar surfaces on and off
- F7 ---------- Grid display Turns the grid display on and off
- F8 ---------- Ortho Mode: Restricts cursor movement to horizontal/vertical
- F9 ---------- Snap Mode: Restricts cursor movement to intervals on the grid
- F10 --------- Polar tracking Guides cursor movement to specified angles
- F11 --------- Object snap tracking Tracks the cursor horizontally and vertically from object snap locations
- F12 --------- Dynamic input Displays dimensions and input options near the cursor
Load the hsbCAD menu
Type the command HSB_MENU in the command line, the Reload hsbCAD menus dialog box opens and confirm by selecting the OK button.
The hsbCAD menu's will appear.

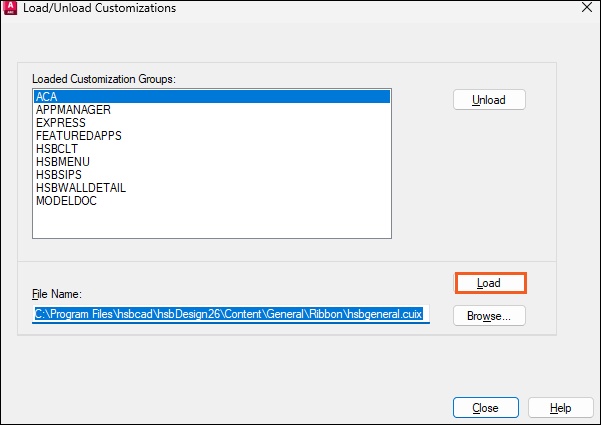
Load the hsbDesign Ribbon
- Enter the command CUILOAD in the AutoCad Arichirtecture command line.
- Select the Browse button.
- Navigate to the folder in the Content of the country you are from, in this case I will navigate to the General ribbon.
C:\Program Files\hsbcad\<hsbDesign..>\Content\General\Ribbon\hsbgeneral
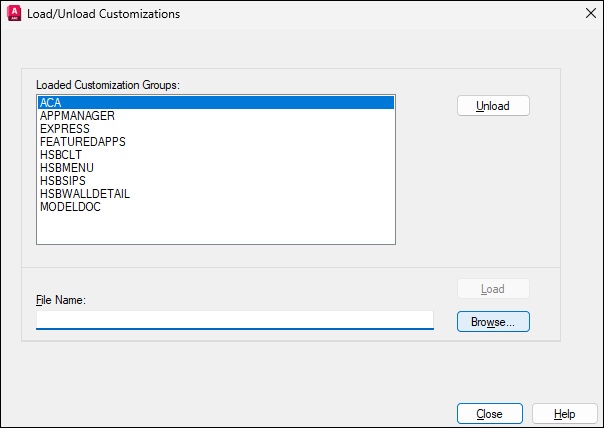

4. Then select the Load button
5. The hsbgeneral ribbon is now loaded in the “Loaded customization groups” section.
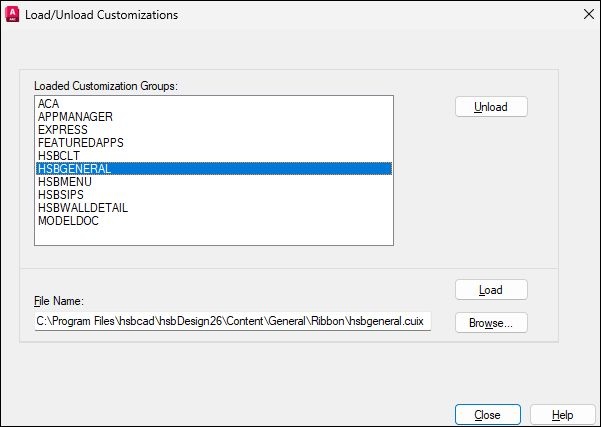
6. Close the dialog box by selecting the Close button.
7. All the General commands are now available in the ribbon bar.
Other interesting document
Ribbon and toolbars disappear
Essential Guide to Missing ribbon
How to load the general ribbons for hsbDesign29
How to install the hsbMenu's and load the hsbRibbon (Video)