This video will show you how to generating or Frame hsbElements with a double click.
CLTPanel Overlap (Adjust Wall Intersection). How to put a certain measurement overlap in the corner.
This video is about hsbcad CLT HFDM Autodesk accelerator.
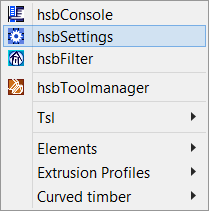
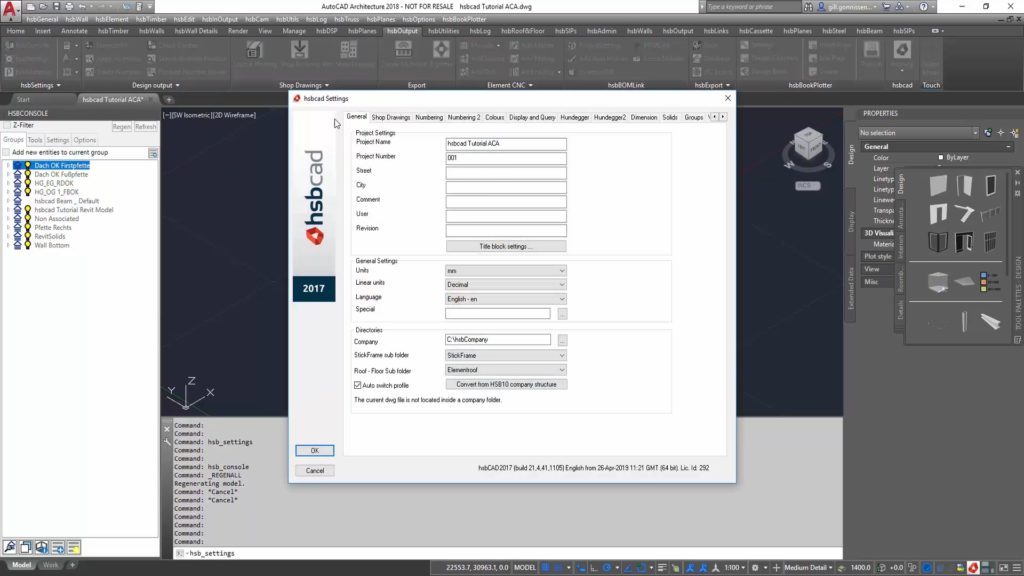
This document will show you the different settings in the hsbGeneral pulldown menu- hsbSettings.
This video will show you how to numbering Log Wall Elements.
The ribbon in your program interface has disappeared, how to restore them. After loading AutoCAD, the ribbon is blank and shows the message:The Ribbon does not have any tabs or panels currently loaded.
In AutoCad 2015 ist der untere Bereich des Arbeitsbereichs dünner geworden als zuvor, da die Zeichnungsstatusleiste, die Anwendungsstatusleiste und die Layout- und Modell-Registerkarten alle zu einer einzigen Leiste zusammengeführt wurden.
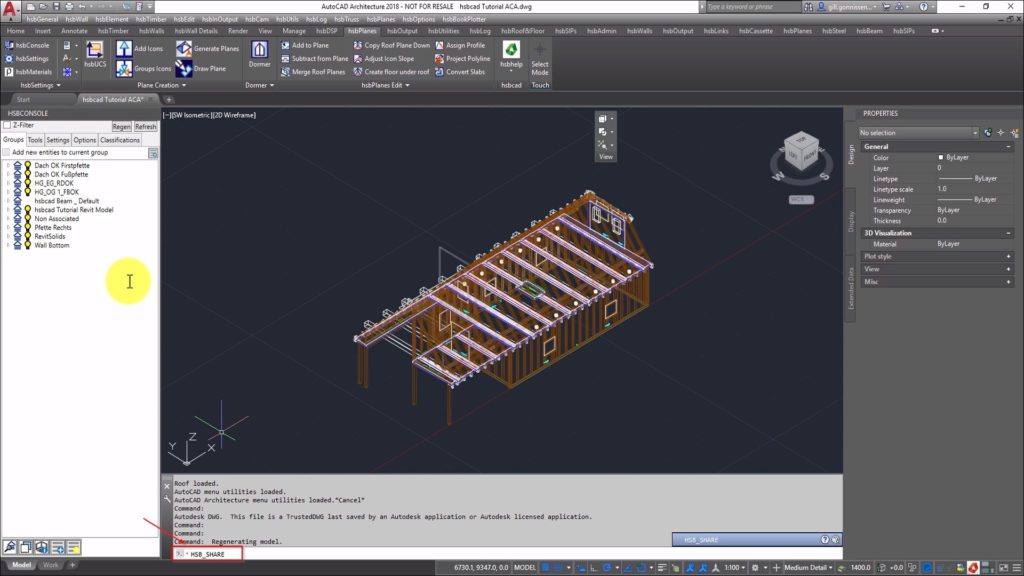
The function of this document is to provide information on the hsb project structure. Every time you start a new drawing the drawing has to be in its own separate folder otherwise you will mix up element information from one drawing with information of an another drawing.
This article shows why sometimes icons in your ribbon show up as questionmarks.
What are the circles in my sheeting. if the wall with the sheeting is higher than the max length it will give you a warning, it creates circles in the sheeting.
How to remove the rectangels in an opening. (Module content).
HsbWall numbering is showing up too long.
In diesem Dokument erfahren Sie, wie Sie die Eigenschaftssätze verwenden. Eine Eigenschaftssatzdefinition gibt die Merkmale einer Gruppe von Eigenschaften an, die einem Objekt zugeordnet werden können.
When you create a section in hsbcad and get a fatal error.
This video is about adding a scale text to a Viewport in a Layout.
This video is about openings in top view.
This video is about missing images in the hsbRibbon.
When you want to dimension element beams manually IN the viewport you need to double click in the viewport and dimension in model space.
This video is about the Menubar.
A barcode is an optical machine-readable representation of data relating to the object to which it is attached. Before you can start to insert a barcode into your titleblock you need to download a barcode text style font (for example; free 3 of 9) and add this to your fonts in your computer.
This video is about assigning a keyboard function to a hsb command.
This video is about loading the hsbMenu and loading the hsbRibbons.
This video is about creating a 3D section.
This video is about exporting the Element weight in Excel.
Erstellen Sie eine Vorlagenzeichnung (eine *.dwt-Datei) mit allen gewünschten Anpassungen.
This video is about importing / adding architectural drawings with Xref.
This shows how to import existing toolpalettes.
This video is about inserting a logo in a layout.
This will show you how to number a project with a leader and the meaning of the function ''Restore default number tag location''.
This is a TSL that can run a number of other specified TSL's.
An expression rule is a stored expression. Expression rules always return a value that may be influenced by one or more inputs.
This video is about renaming the hsbRibbons.
Switching off the hatching in your slab drawings.
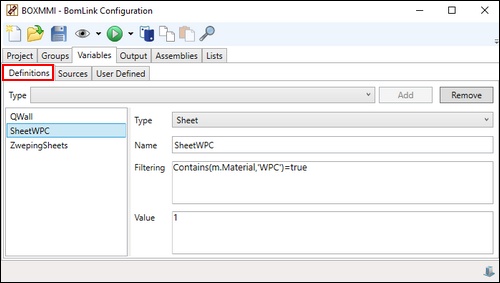
Define variables to be used in rules based on type, from plugin sources or user defined.
How to create a new project in Bomlink and set up the inventory which needs to be used.
Map an assembly to a named component in your model, for example an assembly could exist called firedoor which would contain a list of items related to the fire door and in your model a door style called firedoor also exists.
Create the mapping of a rule to an inventory item.
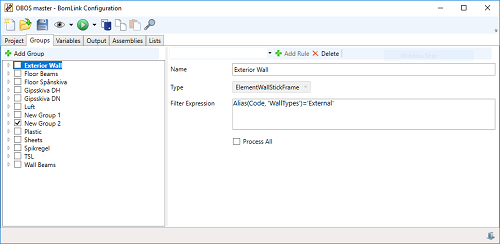
A group is defined so a type entity can be assigned to it. This defines area to create a rule based on the type.
To create list names for purposes of placing rules on a certain place in an output. The list information can be utilised at the output definition.
The hsbBOMLink application is used to create a bill of material (BOM) output of items within and outside of the design model. The information is read from the model and the calculations are based on logical rules defined from the design model.
The rule set preview will help you to formulate, change and check the complete rule or a part of a rule. Rule set preview can only be used when you load a project with 'select model no preview'.
This article describes the different things which can be used as data in Bomlink. Like Project, Inventory, Variable and Model.
The end result of hsbBOMLink is to output all results to a format required. It supports many formats.
How to create and manage your Assembly's
This allows you to manage multiple entity types in a database from a single location. You can assign an alias identifier to each entity type instead of managing each entity type separately in the workflow of rules.
QR codes format for the hsblogistics application
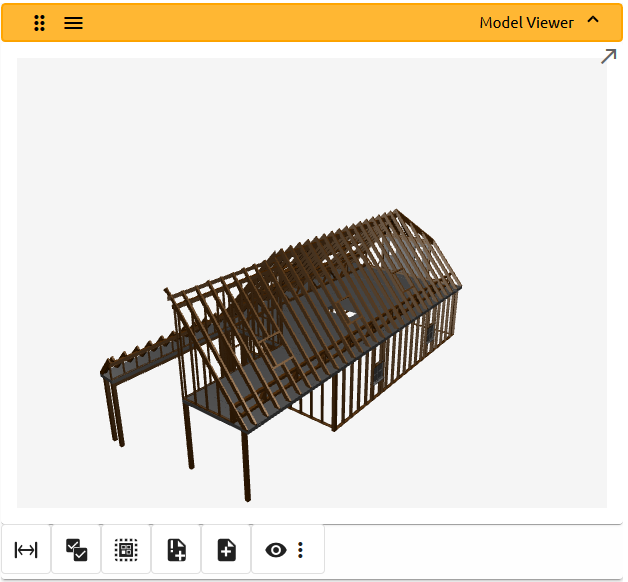
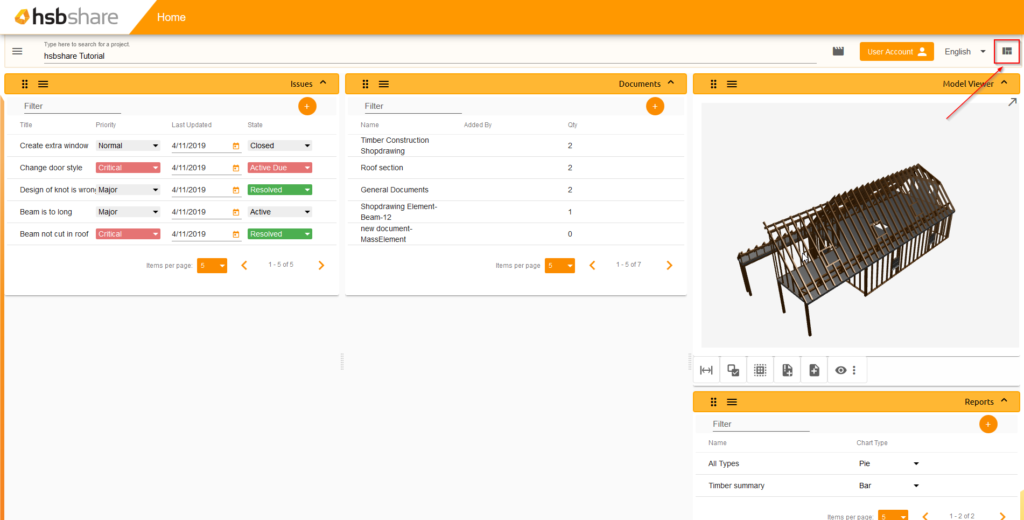
In the model viewer, you can view the model in the current selected project. This widget will also show elements or entities when selecting a Document or an Issue.
hsbLogistics is a mobile app for the construction industry, which allows the user to monitor the location of prefabricated elements.
An Issue is a piece of data which you can attach to an element or an entity. These Issues can have a lot of data attached to it.
This article shows the different widgets which are essential for using hsbshare.
A document is a piece of data which you can attach to an element or entity. These entries can have multiple documents attached to it.
The Team Configuration page is a page where you can manage your teams. This page has a number of different widgets which are related to teams.
Hsbshare has a menu where you can select one of a few predefined dashboard layouts.
The Project Configuration page is a page where you can manage your projects. This page has a number of different widgets which are related to projects.
This article is about uploading a model from AutoCAD® Architecture to hsbshare.
This document will show you how to upload a model from AutoCad Architecture to hsbshare using the Exporter. You can also export a project with some documents attached.
This article is about uploading a model from Revit® to hsbshare.
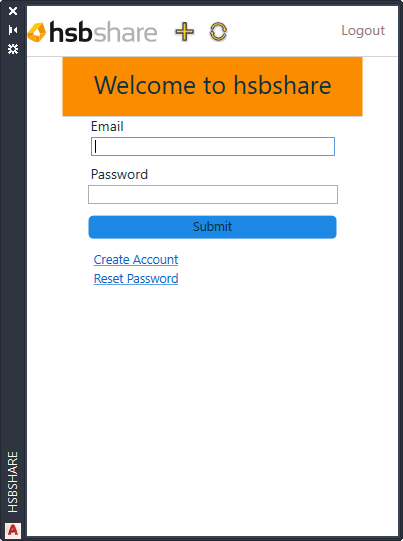
You have 2 way's to create your hsbshare account.
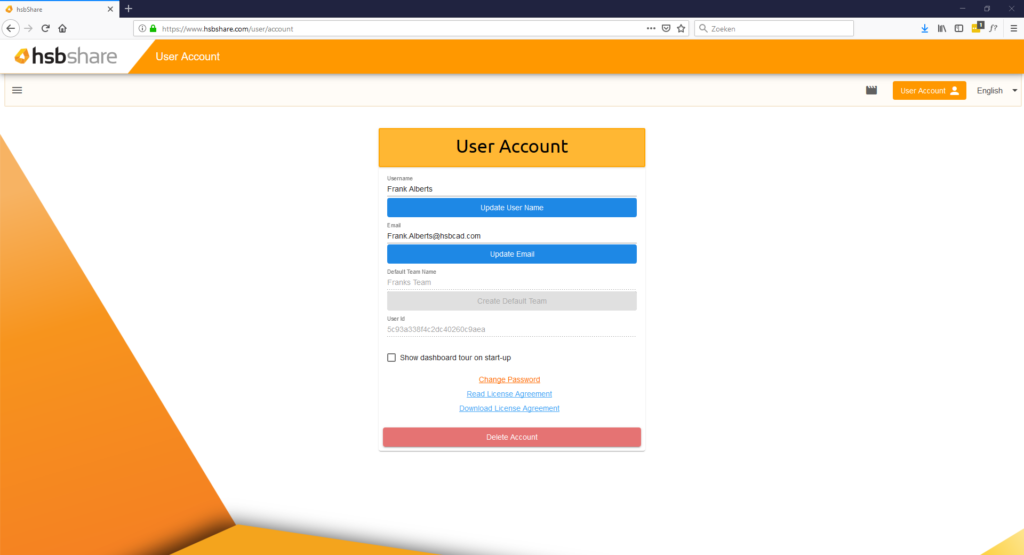
The User Account page is a page where you can manage your account settings.
This Document will describe the workflow to import an ifc file into hsbDesign for Autocad Architecture. The import will use hsbshare as a viewer to visualize the ifc file, so you can make visual decisions on the content you want to import.
Connects two Structural Members with a T-Drill connection.
Adds a Hagoita Bolt system between 2 Structural Members.
Connects two Structural Members with a Okkake connection.
Connects two Structural Members with a Neda connection.
The hsbTimber for Autodesk Revit app uses regular Revit structural members that are created from the standard structural members templates.
Connects two Structural Members with a Dovesugi
Connects two Structural Members with a Bridle Joint connection.
Trims structural members using as a boundary an intersecting face.
Adds a cut to structural member(s). The cutting plane can be defined with a model line.
Adds a Slot opening to structural member(s). You can select any point on a face to place the Slot.
Creates a circular shaped opening on a single structural member. You can select any point on a face to place the drill.
Adds a Convex or Concave profile to the front or rear face of an structural member.
Creates a circular shaped opening on an individual or multiple structural member(s).
Adds a chamfer to the front or rear face of structural member's edge(s).
Stretches a beam against another beam. Extends a structural element(s) to a boundary formed by another structural element.
Connect two Structural Members with a Tenon on the Male Structural Member and a Mortise on the Female Structural Member.
Create notches or trims on structural element(s) using the boundary profile from a selected structural element.
Creates a rectangular shaped opening, cutting trough intervening walls, floors, roofs, structural members and columns. You can cut a structural member with either an existing model line or draw a new model line.
Creates an Arc shaped opening on structural members(s). You can select any point on a face to place the Arc.
Connect two Structural Members with a HousedTenon on the Male Structural Member and a Housed Mortise on the female Structural Member.
Connects two Structural Members with a Scarf Joint.
Adds a Half Lap joint between two structural members.
Connect two Structural Members with a Housed Dove Tenon on the Male Structural Member and a Housed Dove Mortise on the female Structural Member.
Connect two Structural Members with a Dove Tenon on the Male Structural Member and a Dove Mortise on the female Structural Member.
This document will show you how to update your hsbUpdater 2017
This document will show the Site Admin of the ''Myhsbcad'' Account what he/she can see and do.
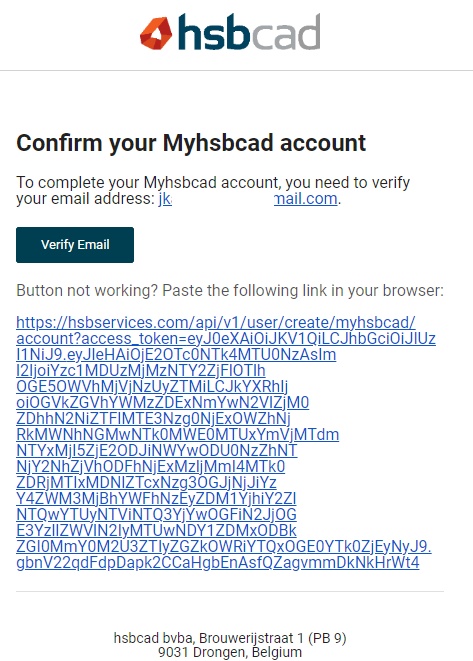
How to create an Myhsbcad account.
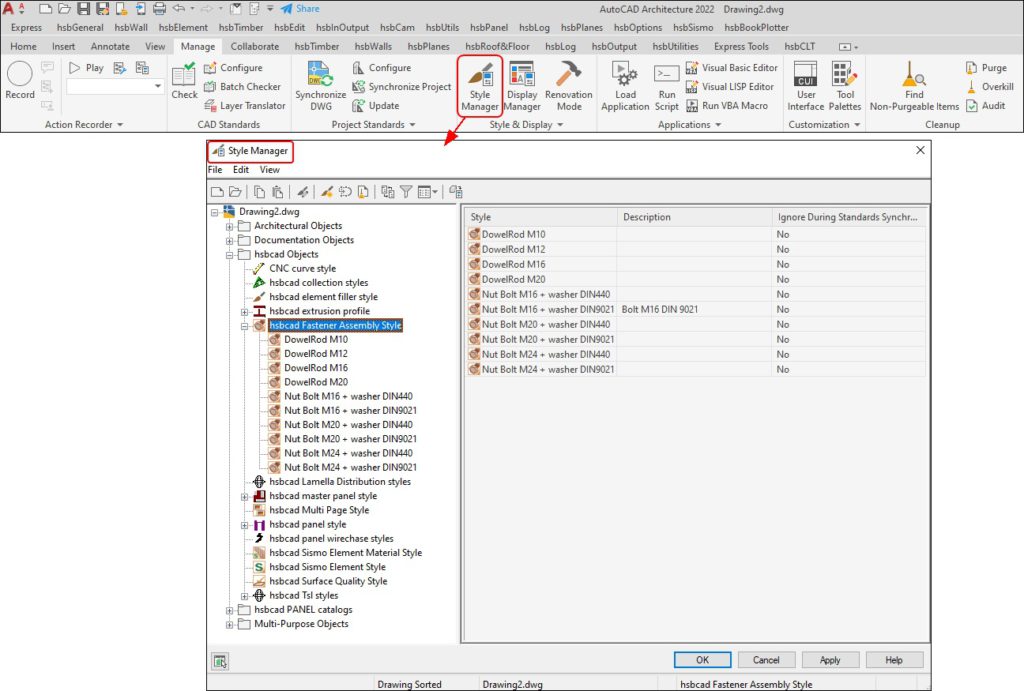
The fastener assembly is a one dimensional collection of entities initially designed for the needs of glulam and Post & Beam Timberframe type construction.
In diesem Dokument erfahren Sie, wie Sie Stäbe bearbeiten.
This Video shows you how to update your hsbcad. The video shows the update process for hsbcad versions up until hsbDesign22.
This video will show you how to switch the height and the width of a beam using the beam UCS.